给大家整理一篇Cocos2d-x相关的编程文章,网友广正奇根据主题投稿了本篇教程内容,涉及到Cocos2d-x、触摸事件、Cocos2d-x触摸事件相关内容,已被918网友关注,涉猎到的知识点内容可以在下方电子书获得。
Cocos2d-x触摸事件
在玩手机游戏的时候,屏幕接收我们的触摸消息是必不可少的,根据我们的触摸事件,去实现相应的功能,这里我们就来学习一下cocos2d-x中的触摸是怎么实现的。触摸分为单点触摸和多点触摸,先来看单点触摸,就是接收一个点的触摸。代码将实现过程清楚的写了下来,仔细分析代码吧。
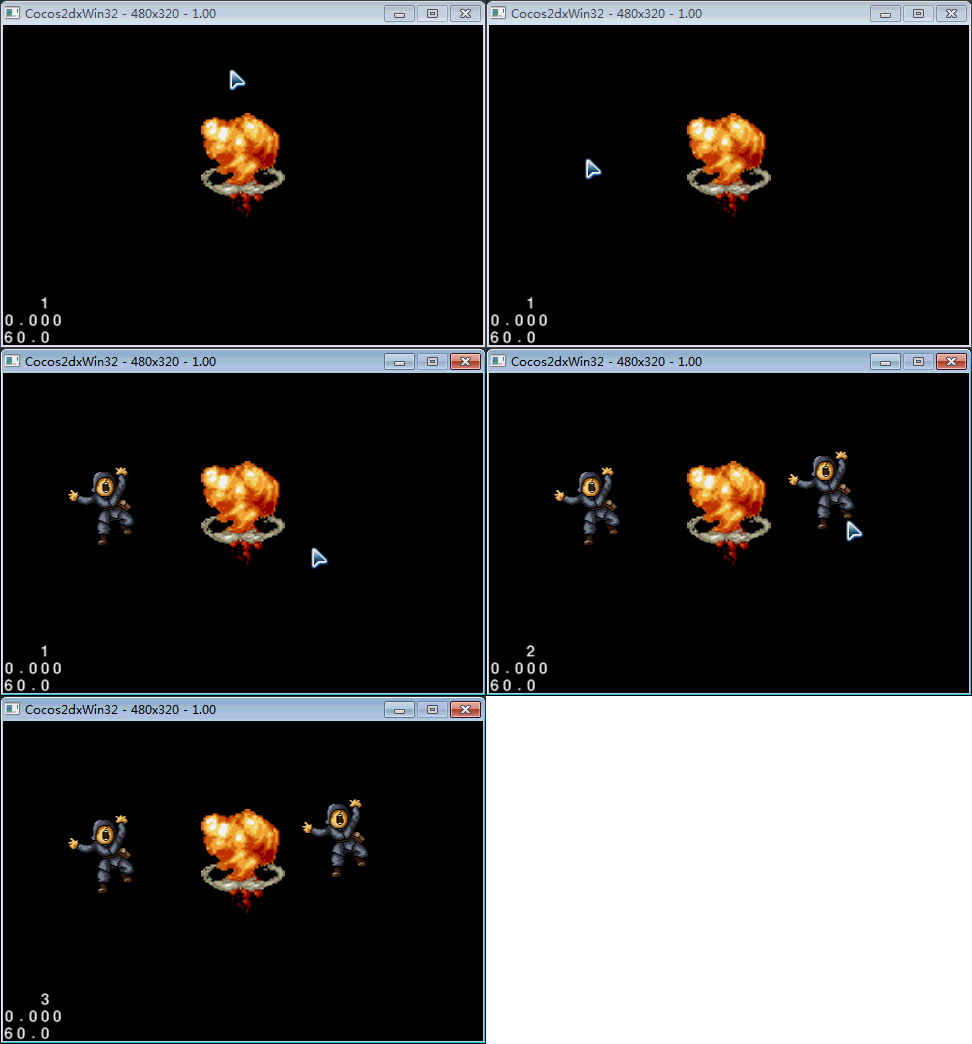
bool HelloWorld::init()
{
  bool bRet = false;
  do
  {
    CC_BREAK_IF(! CCLayer::init());

	//开启触摸
	this->setTouchEnabled(true);

    bRet = true;
  } while (0);

  return bRet;
}

//开启触摸以后必须注册触摸事件,告诉引擎你支持单点触摸还是多点触摸
void HelloWorld::registerWithTouchDispatcher()
{
	//addTargetedDelegate注册单点触摸,第一个参数代表为哪个对象注册触摸事件,第二个代表优先级,数字越
	//小,优先级越高,第三个参数代表是否吞噬消息,如果为true这个节点接受了消息,处理后,优先级比它小的节点
	//就接受不到消息了
	CCDirector::sharedDirector()->getTouchDispatcher()->addTargetedDelegate(this,0,true);
}

//ccTouchBegan是必须要实现的函数,也是在四个协议方法中唯一一个返回值为bool类型的函数
//返回值是true的情况下,会接下来响应ccTouchMoved和ccTouchEnded和ccTouchCancelled函数。
//CCTouch中封装了关于触摸点的一些属性,例如坐标信息,CCEvent没有什么用
bool HelloWorld::ccTouchBegan(CCTouch * pTouch,CCEvent * pEvent)
{
	//获得opengl坐标下的点坐标
	CCPoint point = pTouch->getLocation();

	CCSprite * sprite = CCSprite::create("image.png");
	this->addChild(sprite);
	sprite->setPosition(point);

	return true;
}

//当手指在屏幕上移动的时候不断调用的一个方法
void HelloWorld::ccTouchMoved(CCTouch * touch,CCEvent * pEvent)
{
	//获得opengl坐标下的点坐标
	CCPoint point = touch->getLocation();

	CCSprite * sprite = CCSprite::create("image.png");
	this->addChild(sprite);
	sprite->setPosition(point);
}

//当手指抬起来的时候会调用的方法
void HelloWorld::ccTouchEnded(CCTouch * pTouch,CCEvent * pEvent)
{
	this->removeAllChildrenWithCleanup(true);
}
//还有一个ccTouchCancelled函数,在取消触摸事件的时候调用,比如我们在触屏的时候突然打来了电话
接下来用我们刚刚学到的知识,来实现拖拽精灵移动的效果。

bool HelloWorld::init()
{
  bool bRet = false;
  do
  {
    CC_BREAK_IF(! CCLayer::init());

		//实现拖拽精灵移动的效果
		CCSprite * sprite = CCSprite::create("image2.png");
		sprite->setPosition(ccp(240,180));
		this->addChild(sprite,0,0);

		//开启触摸
		this->setTouchEnabled(true);

    bRet = true;
  } while (0);

  return bRet;
}

//开启触摸以后必须注册触摸事件,告诉引擎你支持单点触摸还是多点触摸
void HelloWorld::registerWithTouchDispatcher()
{
	//addTargetedDelegate注册单点触摸,第一个参数代表为哪个对象注册触摸事件,第二个代表优先级,数字越
	//小,优先级越高,第三个参数代表是否吞噬消息,如果为true这个节点接受了消息,处理后,优先级比它小的节点
	//就接受不到消息了
	CCDirector::sharedDirector()->getTouchDispatcher()->addTargetedDelegate(this,0,true);
}

bool HelloWorld::ccTouchBegan(CCTouch * touch,CCEvent * pEvent)
{
	CCSprite * sprite = (CCSprite *)this->getChildByTag(0);
	//获得手指点击的点的坐标
	CCPoint point = touch->getLocation();
	//获得精灵所在的区域,CCRect包括x,y,width,height
	CCRect rect = sprite->boundingBox();

	//判断手指点击的点是否点在了精灵上
	if(rect.containsPoint(point))
	{
		//返回true则会接受其他的协议消息
		return true;
	}

	return false;
}

void HelloWorld::ccTouchMoved(CCTouch * touch,CCEvent * pEvent)
{
	/*
	这里可以直接将精灵的坐标设置为手指所在点的坐标位置,但是这样的话会产生跳跃的效果,视觉上不好看,这是
	因为精灵是在用自己的锚点占据我们设置的坐标位置,而不是我们点击在精灵身上的那个点放到我们的手指所在的位置
	*/

	//分别获得了手指现在的点击点和手指上次的点击点位置
	CCPoint point = touch->getLocation();
	CCPoint pointPre = touch->getPreviousLocation();
	//ccpSub将俩个点相减,获得一个移动方向的向量
	CCPoint direction = ccpSub(point,pointPre);

	CCSprite * sprite = (CCSprite *)this->getChildByTag(0);
	CCPoint spritePoint = sprite->getPosition();
	//ccpAdd将精灵现在的位置点和移动方向的向量相加,获得精灵将要移动到的位置点
	CCPoint spriteDirection = ccpAdd(spritePoint,direction);
	sprite->setPosition(spriteDirection);
}
接下来学习多点触摸,多点触摸和单点触摸不同的是它的优先级要低于单点触摸,不论注册的时候里边传入的数字是多少,当然还有其它的一些区别,让我们看代码吧。以下是在windows上演示的效果,windows上没法实现多点触摸。

bool HelloWorld::init()
{
  bool bRet = false;
  do
  {
    CC_BREAK_IF(! CCLayer::init());

		//实现拖拽精灵移动的效果
		CCSprite * sprite = CCSprite::create("image2.png");
		sprite->setPosition(ccp(240,180));
		this->addChild(sprite,0,0);

		//开启触摸
		this->setTouchEnabled(true);

    bRet = true;
  } while (0);

  return bRet;
}

void HelloWorld::registerWithTouchDispatcher()
{
	//注册多点触摸,里边只有俩个参数
	CCDirector::sharedDirector()->getTouchDispatcher()->addStandardDelegate(this,0);
}

//在多点触摸中,这四个协议函数在touch后边都加了es,并且每个协议函数不需要都实现,所有的返回值都是void
//CCSet是CCTouch的集合
void HelloWorld::ccTouchesBegan(CCSet * set,CCEvent * pEvent)
{
	//CCSetIterator是一个迭代器
	CCSetIterator iterator;
	//以下的方法就是从CCSet中获得对象的方法
	for(iterator = set->begin();iterator != set->end();iterator++)
	{
		//将元素强制转化为CCTouch *类型
		CCTouch * touch = (CCTouch *)(*iterator);
		CCPoint point = touch->getLocation();

		CCSprite * sprite = CCSprite::create("image.png");
		sprite->setPosition(point);
		this->addChild(sprite);
	}
}
接下来利用上边的多点触摸消息实现精灵的放大和缩放效果,大家看到的相册图片放大和缩小的效果也是这么实现的,但是windows不支持多点,所以这里只是说明原理。
查看源代码打印帮助
bool HelloWorld::init()
{
  bool bRet = false;
  do
  {
    CC_BREAK_IF(! CCLayer::init());

		//实现拖拽精灵移动的效果
		CCSprite * sprite = CCSprite::create("image2.png");
		sprite->setPosition(ccp(240,180));
		this->addChild(sprite,0,0);

		//开启触摸
		this->setTouchEnabled(true);

    bRet = true;
  } while (0);

  return bRet;
}

void HelloWorld::registerWithTouchDispatcher()
{
	//注册多点触摸,里边只有俩个参数
	CCDirector::sharedDirector()->getTouchDispatcher()->addStandardDelegate(this,0);
}

void HelloWorld::ccTouchesBegan(CCSet * set,CCEvent * pEvent)
{
	CCSetIterator iterator = set->begin();
	//获得第一个触摸点
	CCTouch * touch0 = (CCTouch *)(*iterator);
	iterator++;
	//程序执行到这里会死掉,因为windows只支持单点触摸,不支持多点,所以这里是不会获得第二个点的
	CCTouch * touch1 = (CCTouch *)(*iterator);
	length = ccpDistance(touch0->getLocation(),touch1->getLocation());
}

void HelloWorld::ccTouchesMoved(CCSet * set,CCEvent * pEvent)
{
	CCSetIterator iterator = set->begin();
	CCTouch * touch0 = (CCTouch *)(*iterator);
	iterator++;
	CCTouch * touch1 = (CCTouch *)(*iterator);
	float length2 = ccpDistance(touch0->getLocation(),touch1->getLocation());
	float times = length2/length;
	CCSprite * sprite = (CCSprite *)this->getChildByTag(0);
	sprite->setScale(times);
}

