本站精选了一篇vue相关的编程文章,网友崔绮艳根据主题投稿了本篇教程内容,涉及到vue、Html5视频播放器、vue、视频播放器、vue实现自定义H5视频播放器的方法步骤相关内容,已被596网友关注,下面的电子资料对本篇知识点有更加详尽的解释。
vue实现自定义H5视频播放器的方法步骤
前言
前段时间基于vue写了一个自定义的video播放器组件,踩了一些小坑, 这里做一下复盘分享出来,避免日后重复踩坑...
设计阶段
这里就直接放几张完成后的播放状态图吧,界面布局基本就是flex+vw适配一把梭,也比较容易.
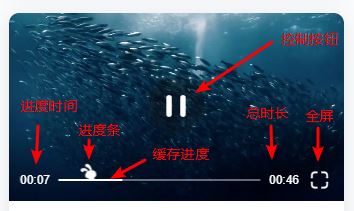
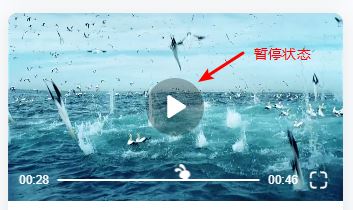
需要实现的几个功能基本都标注出来了; 除了还有一个视频加载失败的...下面就这届上代码了;刚开始构思的时候考虑了一下功能的实现方式: 一是用原生的DOM操作,获取video元素后,用addEventListener来监听; 二是用vue的方式绑定事件监听; 最后图方便采用了两者结合的方式,但是总感觉有点乱, 打算后期再做一下代码格式优化.
video组件实现过程
组件模板部分
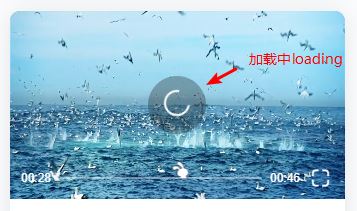
主要是播放器的几种播放状态的逻辑理清楚就好了, 即: 播放中,缓存中,暂停,加载失败这几种情况,下面按功能分别说一下
<template>
 <div class="video-player">
  <!-- 播放器界面; 兼容ios controls-->
  <video
   ref="video"
   v-if="showVideo"
   webkit-playsinline="true"
   playsinline="true"
   x-webkit-airplay="true"
   x5-video-player-type="h5"
   x5-video-player-fullscreen="true"
   x5-video-orientation="portraint"

   preload="auto"
   muted="true"
   poster="https://photo.mac69.com/180205/18020526/a9yPQozt0g.jpg"
   :src="src"
   @waiting="handleWaiting"
   @canplaythrough="state.isLoading = false"
   @playing="state.isLoading = false, state.controlBtnShow = false, state.playing=true"
   @stalled="state.isLoading = true"
   @error="handleError"
  >您的浏览器不支持HTML5</video>
  <!-- 兼容Android端层级问题, 弹出层被覆盖 -->
  <img
   v-show="!showVideo || state.isEnd"
   class="poster"
   src="https://photo.mac69.com/180205/18020526/a9yPQozt0g.jpg"
   alt
  >
  <!-- 控制窗口 -->
  <div
   class="control"
   v-show="!state.isError"
   ref="control"
   @touchstart="touchEnterVideo"
   @touchend="touchLeaveVideo"
  >
   <!-- 播放 || 暂停 || 加载中-->
   <div class="play" @touchstart.stop="clickPlayBtn" v-show="state.controlBtnShow">
    <img
     v-show="!state.playing && !state.isLoading"
     src="../../assets/video/content_btn_play.svg"
    >
    <img
     v-show="state.playing && !state.isLoading"
     src="../../assets/video/content_btn_pause.svg"
    >
    <div class="loader" v-show="state.isLoading">
     <div class="loader-inner ball-clip-rotate">
      <div></div>
     </div>
    </div>
   </div>
   <!-- 控制条 -->
   <div class="control-bar" :>
    <span class="time">{{video.displayTime}}</span>
    <span class="progress" ref="progress">
     <img
      class="progress-btn ignore"
      :
      src="../../assets/video/content_ic_tutu.svg"
     >
     <span class="progress-loaded" :></span>
     <!-- 设置手动移动的进度条 -->
     <span
      class="progress-move"
      @touchmove.stop.prevent="moveIng($event)"
      @touchstart.stop="moveStart($event)"
      @touchend.stop="moveEnd($event)"
     ></span>
    </span>

    <span class="total-time">{{video.totalTime}}</span>
    <span class="full-screen" @click="fullScreen">
     <img src="../../assets/video/content_ic_increase.svg" alt>
    </span>
   </div>
  </div>
  <!-- 错误弹窗 -->
  <div class="error" v-show="state.isError">
   <p class="lose">视频加载失败</p>
   <p class="retry" @click="retry">点击重试</p>
  </div>
 </div>
</template>
播放器初始化
这里有个坑点我就是当父元素隐藏即display:none时,getBoundingClientRect()是获取不到元素的尺寸数值的,后来查了MDN文档,按上面说的改了一下border也没有用,最后尝试设置元素visibility属性为hidden后发现就可以获取了.
getBoundingClientRect() : 返回元素的大小及其相对于视口的位置, 这个api在计算元素相对位置的时候挺好用的.
  init() {
   // 初始化video,获取video元素
   this.$video = this.$el.getElementsByTagName("video")[0];
   this.initPlayer();
  },
  // 初始化播放器容器, 获取video-player元素
  // getBoundingClientRect()以client可视区的左上角为基点进行位置计算
  initPlayer() {
   const $player = this.$el;
   const $progress = this.$el.getElementsByClassName("progress")[0];
   // 播放器位置
   this.player.$player = $player;
   this.progressBar.$progress = $progress;
   this.player.pos = $player.getBoundingClientRect();
   this.progressBar.pos = $progress.getBoundingClientRect()
   this.video.progress.width = Math.round($progress.getBoundingClientRect().width);
  },
播放 && 暂停点击
我这里把事件监听都放在只有满足正在播放视频才开始事件监听; 感觉原生监听和vue方式的监听混合在一起写有点别扭...emem...这里需要对this.$video.play()做一个异常处理,防止video刚开始加载的时候失败,如果视频链接出错,play方法调用不了会抛错,后面我也用了video的error事件去监听播放时的错误
// 点击播放 & 暂停按钮
  clickPlayBtn() {
   if (this.state.isLoading) return;
   this.isFirstTouch = false;
   this.state.playing = !this.state.playing;
   this.state.isEnd = false;
   if (this.$video) {
    // 播放状态
    if (this.state.playing) {
     try {
      this.$video.play();
      this.isPauseTouch = false;
      // 监听缓存进度
      this.$video.addEventListener("progress", e => {
       this.getLoadTime();
      });
      // 监听播放进度
      this.$video.addEventListener(
       "timeupdate",
       throttle(this.getPlayTime, 100, 1)
      );
      // 监听结束
      this.$video.addEventListener("ended", e => {
       // 重置状态
       this.state.playing = false;
       this.state.isEnd = true;
       this.state.controlBtnShow = true;
       this.video.displayTime = "00:00";
       this.video.progress.current = 0;
       this.$video.currentTime = 0;
      });
     } catch (e) {
      // 捕获url异常出现的错误
     }
    }
    // 停止状态
    else {
     this.isPauseTouch = true;
     this.$video.pause();
    }
   }
  },
视频控制条显示和隐藏
这里需要加两个开关; 首次触屏和暂停触屏; 做一下显示处理即可
// 触碰播放区
  touchEnterVideo() {
   if (this.isFirstTouch) return;
   if (this.hideTimer) {
    clearTimeout(this.hideTimer);
    this.hideTimer = null;
   }
   this.state.controlBtnShow = true;
   this.state.controlBarShow = true;
  },
  // 离开播放区
  touchLeaveVideo() {
   if (this.isFirstTouch) return;
   if (this.hideTimer) {
    clearTimeout(this.hideTimer);
   }
   // 暂停触摸, 不隐藏
   if (this.isPauseTouch) {
    this.state.controlBtnShow = true;
    this.state.controlBarShow = true;
   } else {
    this.hideTimer = setTimeout(() => {
     this.state.controlBarShow = false;
     // 加载中只显示loading
     if (this.state.isLoading) {
      this.state.controlBtnShow = true;
     } else {
      this.state.controlBtnShow = false;
     }
     this.hideTimer = null;
    }, 3000);
   }
  },
视频错误处理和等待处理
这里错误直接用error事件, 加载中用stalled事件来监听视频阻塞状态,等待数据加载用的waiting事件; 显示对应的loading动画即可
// loading动画
@keyframes rotate {
 0% {
  transform: rotate(0deg);
 }
 50% {
  transform: rotate(180deg);
 }
 100% {
  transform: rotate(360deg);
 }
}

.loader {
 width: 58px;
 height: 58px;
 background: rgba(15, 16, 17, 0.3);
 border-radius: 50%;
 position: relative;
 .ball-clip-rotate {
  position: absolute;
  left: 50%;
  top: 50%;
  transform: translate(-50%, -50%);
  > div {
   width: 15px;
   height: 15px;
   border-radius: 100%;
   margin: 2px;
   animation-fill-mode: both;

   border: 2px solid #fff;
   border-bottom-color: transparent;
   height: 26px;
   width: 26px;
   background: transparent;
   display: inline-block;
   animation: rotate 0.75s 0s linear infinite;
  }
 }
}
播放时间设置
基本就是video对象的currentTime和duration这两个属性; 这里注意下视频如果没有设置预加载属性preload的话,在video元素初始化的时候是获取不到duration的...那你只能在播放的时候去拿了.
// 获取播放时间
  getPlayTime() {
   const percent = this.$video.currentTime / this.$video.duration;
   this.video.progress.current = Math.round(
    this.video.progress.width * percent
   );
   // 赋值时长
   this.video.totalTime = timeParse(this.$video.duration);
   this.video.displayTime = timeParse(this.$video.currentTime);
  },
  // 获取缓存时间
  getLoadTime() {
   // console.log('缓存了...',this.$video.buffered.end(0));
   this.video.loaded =
    (this.$video.buffered.end(0) / this.$video.duration) * 100;
  },
手动滑动进度条控制
这里直接用touch事件即可; 注意touchend中使用e.changedTouches;因为当手指离开屏幕,touches和targetTouches中对应的元素会同时移除,而changedTouches仍然会存在元素。
- touches: 当前屏幕上所有触摸点的列表;
- targetTouches: 当前对象上所有触摸点的列表;
- changedTouches: 涉及当前(引发)事件的触摸点的列表
// 手动调节播放进度
  moveStart(e) {},
  moveIng(e) {
   // console.log("触摸中...");
   let currentX = e.targetTouches[0].pageX;
   let offsetX = currentX - this.progressBar.pos.left;
   // 边界检测
   if (offsetX <= 0) {
    offsetX = 0
   }
   if (offsetX >= this.video.progress.width) {
    offsetX = this.video.progress.width
   }
   this.video.progress.current = offsetX;

   let percent = this.video.progress.current / this.video.progress.width;
   this.$video.duration && this.setPlayTime(percent, this.$video.duration)
  },
  moveEnd(e) {
   // console.log("触摸结束...");
   let currentX = e.changedTouches[0].pageX;
   let offsetX = currentX - this.progressBar.pos.left;
   this.video.progress.current = offsetX;
   // 这里的offsetX都是正数
   let percent = offsetX / this.video.progress.width;
   this.$video.duration && this.setPlayTime(percent, this.$video.duration)
  },
  // 设置手动播放时间
  setPlayTime(percent, totalTime) {
   this.$video.currentTime = Math.floor(percent * totalTime);
  },
全屏功能
这个功能在手机上会有写兼容性问题...有待完善
// 设置全屏
  fullScreen() {
   console.log('点击全屏...');
   if (!this.state.fullScreen) {
    this.state.fullScreen = true;
    this.$video.webkitRequestFullScreen();
   } else {
    this.state.fullScreen = false;
    document.webkitCancelFullScreen();
   }
坑点汇总
1.视频预加载才能获取时长
需要设置预加载 preload="auto"
2.Element.getBoundingClientRect()方法返回元素的大小及其相对于视口的位置
父元素设置display:none时获取不到尺寸数据民谣改为visibility:hidden
3.play()方法异常捕获
try{ xxxxx.play } catch(e) { yyyyyy }
4.安卓手机video兼容性处理, 视频播放时层级置顶,会影响全局弹出层样式
我这里做的处理是当弹出层出现时把视频给隐藏掉(宽高为0,或者直接去掉),用封面图来替代
5.ios下全屏处理
设置相应属性即可, playsinline
代码直通车: https://github.com/appleguardu/vue-h5-video
以上就是本文的全部内容,希望对大家的学习有所帮助,也希望大家多多支持码农之家。