给大家整理了vue相关的编程文章,网友邰雅柔根据主题投稿了本篇教程内容,涉及到vue、swipe、分页组件、基于vue实现swipe分页组件实例相关内容,已被490网友关注,如果对知识点想更进一步了解可以在下方电子资料中获取。
基于vue实现swipe分页组件实例
项目背景
图片轮播是前端项目必有项,当前有很多效果很酷炫的轮播插件,例如 Swiper 。
但是当我们项目中的图片轮播只需要一个很简单的轮播样式,比如这样的

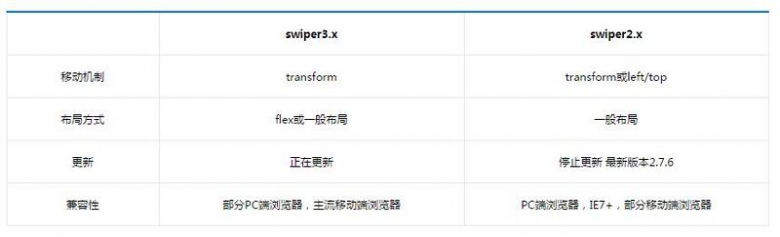
我们引用这样一个 110k 的大插件,就大材小用了。再安利一下,swiper2.x和swiper3.x对移动和PC端支持情况如下图
当当当当~~~
我们今天的主角登场了, thebird/Swipe ,这个插件完成了图片轮播需要的基本功能,只有 14.2k ,真真的 轻量级 啊。还有,还有

翻译一下,就是俺们全支持,不管你是PC端(IE7+)还是移动端浏览器。此处应该有掌声,哈哈~
简而言之,就是当需要一个简单的轮播时,可以选用 thebird/Swipe ,自己写一个组件。
举个栗子,就是我实现的这个—— 基于 vue 实现swipe分页组件 ,移动端和PC端均适用哦。
Result
Usage
一般情况,轮播图片因为是要经常换的,故在后台定制,定制内容如下
<div><a href=""><img src=" rel="external nofollow" rel="external nofollow" rel="external nofollow" "/></a></div>
<div><a href=""><img src=" rel="external nofollow" rel="external nofollow" rel="external nofollow" "/></a></div>
<div><a href=""><img src=" rel="external nofollow" rel="external nofollow" rel="external nofollow" "/></a></div>
没有定制,必须在代码里写的话,也是可以的,造一个data数组swipeInfo
<!--js-->
data:{
  swipeInfo:[{
    href:"http://www.baidu.com",
    imgSrc:""
  },{
    href:"http://www.baidu.com",
    imgSrc:""
  },{
    href:"http://www.baidu.com",
    imgSrc:""
  }]
},
components: {
  'swipe-module': require('pagination-swipe'),
},
在html中绑定该数据
<!--html-->
<swipe-module :swipeinfo="swipeInfo"></swipe-module>
pagination-swipe组件内容
按照swipe构造html框架,添加了pagination块
<!--template.html-->
<div v-el:swipe class='swipe bar-slider'>
  <div class='swipe-wrap'>
    <div v-for="item in swipeinfo"><a :href=item.href><img :src=item.imgSrc /></a></div>
  </div>
  <!-- 分页 -->
  <div class="pagination">
    <span class="swipe-pagination-switch swipe-active-switch" @click="slideToCur(0)"></span>
    <span class="swipe-pagination-switch" @click="slideToCur($index+1)" v-for="item in slideNum"></span>
  </div>
</div>
vue构造组件
//index.js
require('./style.less');
var Swipe = require('swipe');

Vue.component('pagination-swipe',{
  props: ['swipeinfo'],
  template: require('raw!./template.html'),
  data: function() {
    return {
      mySwipe: {},
      slideNum: {},
    };
  },
  ready: function() {
    var self = this;
    //获取子组件中分页小圈圈
    var slides = self.$els.swipe.getElementsByClassName('swipe-pagination-switch');
    self.mySwipe = new Swipe(self.$els.swipe, {
      startSlide: 0,
      continuous: true,
      speed: 1000,
      auto: 4000,
      stopPropagation: false,
      callback: function(index, elem) {
        //渲染分页小圈圈
        for (var i = 0; i < slides.length; i++) {
          if (i != index) {
            slides[i].style.opacity = "0.2";
            slides[i].style.background = "#000";
          } else {
            slides[index].style.opacity = "1";
            slides[index].style.background = "#ee3a4a";
          }
        }
      },
    });
    self.slideNum = self.mySwipe.getNumSlides() - 1;
  },
  methods: {
    //点击底部小圈圈,跳到其所对应页
    slideToCur: function(index) {
      var self = this;
      self.mySwipe.slide(index, 300);
    },
  }
});
<!--style.less-->
.swipe {
  overflow: hidden;
  visibility: hidden;
  position: relative;
  height: 200/@rem;
  .swipe-wrap {
    position: relative;
    overflow: hidden;
    height: 100%;
    div {
      float: left;
      width: 100%;
      position: relative;
      margin: 0;
      a {
        width: 100%;
        height: 100%;
        background-position: center 0;
        background-repeat: no-repeat;
        background-color: transparent;
        display: block;
        img {
          width: 100%;
          height: 100%;
        }
      }
    }
  }
  .pagination {
    text-align: center;
    position: relative;
    bottom: 40/@rem;
    cursor: pointer;
  }
  .swipe-pagination-switch {
    content: "";
    display: inline-block;
    width: 8px;
    height: 8px;
    border-radius: 100%;
    background: #000;
    opacity: 0.2;
    margin: 0 8px;
    z-index: 10;
    &:first-child {
      background: #ee3a4a;
    }
  }
  .swipe-active-switch {
    opacity: 1;
  }
}
以上就是本文的全部内容,希望对大家的学习有所帮助,也希望大家多多支持码农之家。