给网友朋友们带来一篇相关的编程文章,网友车翰飞根据主题投稿了本篇教程内容,涉及到SpringCloud_Eureka、SpringCloud_Eureka服务注册、SpringCloud_Eureka服务发现、SpringCloud_Eureka相关内容,已被191网友关注,内容中涉及的知识点可以在下方直接下载获取。
SpringCloud_Eureka
代码链接
https://github.com/lidonglin-bit/cloud
一、Eureka基础知识
1.什么是服务治理
SpringCloud封装了Netflix公司开发的Eureka模块来实现服务治理。
在传统的RPC远程调用框架中,管理每个服务与服务之间依赖关系比较复杂、所以需要进行服务治理,管理服务与服务之间依赖关联,以实现服务调用,负载均衡、容错等,实现服务发现与注册。
2.什么是服务注册
Eureka采用了CS的设计架构,Eureka Server作为服务注册功能的服务器,它是服务注册中心。
而系统中的其他微服务,使用Eureka的客户端连接到Eureka Server并维持心跳连接。这样系统的维护人员可以通过Eureka Server来监控系统中各个微服务是否正常运行。
在服务注册与发现中,有一个注册中心。当服务器启动的时候,会把当前自己服务器的信息,比如:服务通讯地址等以别名方式注册到注册中心上。
另一方(消费者服务),以该别名的方式去注册中心上获取到实际的服务通讯地址,然后,再实现本地RPC远程调用。
RPC远程调用框架核心设计思想:在于注册中心,因为使用注册中心管理每个服务与服务之间的一个依赖关系(服务治理概念)。
在任何RPC远程框架中,都会有一个注册中心(存放服务地址相关信息(接口地址))。

3.Eureka两组件
Eureka Server提供服务注册服务
各个微服务节点通过配置启动后,会在Eureka Server中进行注册,这样Eureka Server中的服务注册表中将会存储所有可用服务节点的信息,服务节点的信息可以在界面中直观看到。
Eureka Client通过注册中心进行访问
是一个Java客户端,用于简化Eureka Server的交互,客户端同时也具备一个内置的、使用轮询(round-robin)负载算法的负载均衡器。在应用启动后,将会在Eureka Server发送心跳(默认周期30秒)。如果Eureka Server在多个心跳周期内没有收到某个节点的心跳,Eureka Server将会从服务注册表中把这个服务节点移出(默认90秒)
二、单机Eureka构建步骤
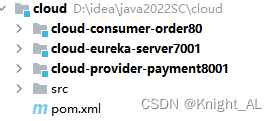
整体结构
父工程pom文件
  <!-- 统一管理jar包版本 -->
    <properties>
        <project.build.sourceEncoding>UTF-8</project.build.sourceEncoding>
        <maven.compiler.source>1.8</maven.compiler.source>
        <maven.compiler.target>1.8</maven.compiler.target>
    </properties>
    <!-- 子模块继承之后,提供作用:锁定版本+子modlue不用写groupId和version  -->
    <dependencyManagement>
        <dependencies>
            <!--spring boot 2.2.2-->
            <dependency>
                <groupId>org.springframework.boot</groupId>
                <artifactId>spring-boot-dependencies</artifactId>
                <version>2.2.2.RELEASE</version>
                <type>pom</type>
                <scope>import</scope>
            </dependency>
            <!--spring cloud Hoxton.SR1-->
            <dependency>
                <groupId>org.springframework.cloud</groupId>
                <artifactId>spring-cloud-dependencies</artifactId>
                <version>Hoxton.SR1</version>
                <type>pom</type>
                <scope>import</scope>
            </dependency>
            <!--spring cloud alibaba 2.1.0.RELEASE-->
            <dependency>
                <groupId>com.alibaba.cloud</groupId>
                <artifactId>spring-cloud-alibaba-dependencies</artifactId>
                <version>2.1.0.RELEASE</version>
                <type>pom</type>
                <scope>import</scope>
            </dependency>
        </dependencies>
    </dependencyManagement>
    <build>
        <plugins>
            <plugin>
                <groupId>org.springframework.boot</groupId>
                <artifactId>spring-boot-maven-plugin</artifactId>
                <configuration>
                    <fork>true</fork>
                    <addResources>true</addResources>
                </configuration>
            </plugin>
        </plugins>
    </build>
1.IDEA生成eurekaServer端服务注册中心
1.建Module:cloud-eureka-server7001
2.改POM
    <dependencies>
        <dependency>
            <groupId>org.springframework.cloud</groupId>
            <artifactId>spring-cloud-starter-netflix-eureka-server</artifactId>
        </dependency>
        <dependency>
            <groupId>org.springframework.boot</groupId>
            <artifactId>spring-boot-starter-web</artifactId>
        </dependency>
    </dependencies>
</project>
1.X和2.X的对比说明
1.X版本
<dependency>
<groupId>org.springframework.cloud</groupId>
<artifactId>spring-cloud-starter-eureka</artifactId>
</dependency>
2.X版本
<dependency>
<groupId>org.springframework.cloud</groupId>
<artifactId>spring-cloud-starter-netflix-eureka-server</artifactId>
</dependency>
3.写YML
server:
port: 7001
spring:
application:
name: cloud-eureka-server7001
eureka:
instance:
hostname: localhost
#因为服务端不需要注册,所有为false
client:
register-with-eureka: false
fetchRegistry: false
service-url:
defaultZone: http://localhost:7001/eureka
4.主启动
@SpringBootApplication
@EnableEurekaServer
public class EurekaMain7001 {
    public static void main(String[] args) {
        SpringApplication.run(EurekaMain7001.class,args);
    }
}
5.测试
2.服务提供者
EurekaClient端cloud-provider-payment8001将注册进EurekaServer成为服务提供者provider
1.建Module:cloud-provider-payment8001
2.改POM
        <dependency>
            <groupId>org.springframework.cloud</groupId>
            <artifactId>spring-cloud-starter-netflix-eureka-client</artifactId>
        </dependency>
        <dependency>
            <groupId>org.springframework.boot</groupId>
            <artifactId>spring-boot-starter-web</artifactId>
        </dependency>
3.写YML
spring:
application:
name: cloud-provider-payment8001
server:
port: 8001
eureka:
client:
register-with-eureka: true
fetchRegistry: true
service-url:
defaultZone: http://localhost:7001/eureka
4.主启动
@SpringBootApplication
@EnableEurekaClient
public class PaymentMain8001 {
    public static void main(String[] args) {
        SpringApplication.run(PaymentMain8001.class,args);
    }
}
5.测试
先启动EurekaServer
3.服务消费者
EurekaClient端cloud-consumer-order80将注册进EurekaServer成为服务消费者consumer
1.建Module:cloud-consumer-order80
2.改POM
        <dependency>
            <groupId>org.springframework.cloud</groupId>
            <artifactId>spring-cloud-starter-netflix-eureka-client</artifactId>
        </dependency>
        <dependency>
            <groupId>org.springframework.boot</groupId>
            <artifactId>spring-boot-starter-web</artifactId>
        </dependency>
3.写YML
spring:
application:
name: cloud-consumer-order80
server:
port: 80
eureka:
client:
register-with-eureka: true
fetchRegistry: true
service-url:
defaultZone: http://localhost:7001/eureka
4.主启动
@SpringBootApplication
@EnableEurekaClient
public class OrderMain80 {
    public static void main(String[] args) {
        SpringApplication.run(OrderMain80.class,args);
    }
}
5.测试
1)先要启动EurekaServer,7001服务
2)再要启动服务提供者8001服务和服务消费者80服务
3)eureka服务器

4)测试查询:http://localhost/consumer/payment/get/31
5)测试添加:postman测试添加
6)测试8001服务和80服务效果一样

到此这篇关于SpringCloud_Eureka服务注册与发现基础及构建步骤的文章就介绍到这了,更多相关SpringCloud_Eureka内容请搜索码农之家以前的文章或继续浏览下面的相关文章希望大家以后多多支持码农之家!