本站精选了一篇C语言遍历相关的编程文章,网友隆暄婷根据主题投稿了本篇教程内容,涉及到C语言、二叉树、数据结构、遍历、C语言二叉树各种遍历相关内容,已被780网友关注,内容中涉及的知识点可以在下方直接下载获取。
C语言二叉树各种遍历
二叉树遍历的基本思想
二叉树的遍历本质上其实就是入栈出栈的问题,递归算法简单且容易理解,但是效率始终是个问题。非递归算法可以清楚的知道每步实现的细节,但是乍一看不想递归算法那么好理解,各有各的好处吧。接下来根据下图讲讲树的遍历。
1、先序遍历:先序遍历是先输出根节点,再输出左子树,最后输出右子树。上图的先序遍历结果就是:ABCDEF
2、中序遍历:中序遍历是先输出左子树,再输出根节点,最后输出右子树。上图的中序遍历结果就是:CBDAEF
3、后序遍历:后序遍历是先输出左子树,再输出右子树,最后输出根节点。上图的后序遍历结果就是:CDBFEA
其中,后序遍历的非递归算法是最复杂的,我用了一个标识符isOut来表明是否需要弹出打印。因为只有当节点的左右子树都打印后该节点 才能弹出栈打印,所以标识isOut为1时打印,isOut初始值为0,这主要是为了处理非叶子节点。由后序遍历的原理决定,左右子树都被打印该节点才能打印,所以该节点肯定会被访问2次,第一次的时候不要打印,第二次打印完右子树的时候打印。叶子节点打印完后将isOut置为1。(纯粹是自己想的,应该还有逻辑更简单的算法)
实例
构造和遍历
#include <stdio.h>
#include <stdlib.h>

typedef struct _NODE//节点结构
{
  struct _NODE* leftChild;
  int value;
  struct _NODE* rightChild;
} NODE, *PNODE;

PNODE createNode(int value){//创建一个新节点
  PNODE n = (PNODE)malloc(sizeof(NODE));
  n->value = value;
  n->leftChild = NULL;
  n->rightChild = NULL;
  return n;
}

PNODE insertLeftChild(PNODE parent, int value){//在指定节点上插入左节点
  return (parent->leftChild = createNode(value));
}

PNODE insertRightChild(PNODE parent, int value){//在指定节点上插入左节点
  return (parent->rightChild = createNode(value));
}

void createBTree(PNODE root, int i){//向树中插入一些元素
  if (i == 0)
  {
    return;
  }
  else{
    PNODE l = insertLeftChild(root, i * 10 + 1);
    PNODE r = insertRightChild(root, i * 10 + 2);
    createBTree(l, --i);
    createBTree(r, i);
  }
}

void printDLR(PNODE root){//先序遍历:对每一刻子树都是根->左->右的顺序
  if (root == NULL)
  {
    return;
  }
  printf("%-4d", root->value);
  printDLR(root->leftChild);
  printDLR(root->rightChild);
}

void printLDR(PNODE root){//中序遍历:
  if (root == NULL)
  {
    return;
  }
  printLDR(root->leftChild);
  printf("%-4d", root->value);
  printLDR(root->rightChild);
}

void printLRD(PNODE root){//后序遍历
  if (root == NULL)
  {
    return;
  }
  printLRD(root->leftChild);
  printLRD(root->rightChild);
  printf("%-4d", root->value);
}

void main(){
  PNODE root = createNode(0);//创建根节点
  createBTree(root, 3);

  printf("先序遍历: ");
  printDLR(root);//遍历
  printf("\n中序遍历: ");

  printLDR(root);
  printf("\n后序遍历: ");

  printLRD(root);
  printf("\n");
}
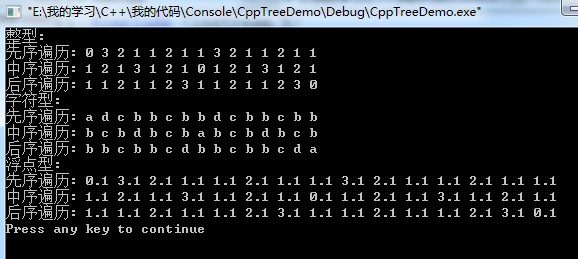
执行结果:
先序遍历:
中序遍历:
后序遍历:
C++中可以使用类模板,从而使节点值的类型可以不止限定在整型:
#include <iostream.h>

template <class T> class Node//节点类模板
{
public:
  Node(T value):value(value)//构造方法
  {
    leftChild = 0;
    rightChild = 0;
  }
  Node* insertLeftChild(T value);//插入左孩子,返回新节点指针
  Node* insertRightChild(T vallue);//插入右孩子
  void deleteLeftChild();//删左孩子
  void deleteRightChild();//删右孩子
  void showDLR();//先序遍历
  void showLDR();//中序遍历
  void showLRD();//后序遍历
protected:
  T value;//节点值
  Node* leftChild;//左孩子指针
  Node* rightChild;//右孩子指针
private:
};

template <class T> Node<T>* Node<T>::insertLeftChild(T value){//插入左孩子
  return (this->leftChild = new Node(value));
}

template <class T> Node<T>* Node<T>::insertRightChild(T value){//插入右孩子
  return (this->rightChild = new Node(value));
}

template <class T> void Node<T>::deleteLeftChild(){//删除左孩子
  delete this->leftChild;
  this->leftChild = 0;
}

template <class T> void Node<T>::deleteRightChild(){//删除右孩子
  delete this->rightChild;
  this->rightChild = 0;
}

template <class T> void Node<T>::showDLR(){//先序遍历
  cout<<this->value<<" ";
  if (leftChild)
  {
    leftChild->showDLR();
  }
  if (rightChild)
  {
    rightChild->showDLR();
  }
}

template <class T> void Node<T>::showLDR(){//中序遍历
  if (leftChild)
  {
    leftChild->showLDR();
  }
  cout<<this->value<<" ";
  if (rightChild)
  {
    rightChild->showLDR();
  }
}

template <class T> void Node<T>::showLRD(){//后序遍历
  if (leftChild)
  {
    leftChild->showLRD();
  }
  if (rightChild)
  {
    rightChild->showLRD();
  }
  cout<<this->value<<" ";
}

template <class T> void createSomeNodes(Node<T>* root, int i, T base){//构建一个二叉树
  if (i == 0)
  {
    return;
  }
  Node<T>* l = root->insertLeftChild(i + base);
  Node<T>* r = root->insertRightChild(i + base);
  createSomeNodes(l, --i, base);
  createSomeNodes(r, i, base);
}

template <class T> void showTest(Node<T>* root){//显示各种遍历方式结果
  cout<<"先序遍历: ";
  root->showDLR();
  cout<<endl<<"中序遍历: ";
  root->showLDR();
  cout<<endl<<"后序遍历: ";
  root->showLRD();
  cout<<endl;
}

void main(){
  Node<int> *root1 = new Node<int>(0);
  createSomeNodes(root1, 3, 0);
  cout<<"整型:"<<endl;
  showTest(root1);

  Node<char> *root2 = new Node<char>('a');
  createSomeNodes(root2, 3, 'a');
  cout<<"字符型:"<<endl;
  showTest(root2);

  Node<float> *root3 = new Node<float>(0.1f);
  createSomeNodes(root3, 3, 0.1f);
  cout<<"浮点型:"<<endl;
  showTest(root3);
}