给大家整理了相关的编程文章,网友沈心宜根据主题投稿了本篇教程内容,涉及到vue、validator、vue、validator、实例、vue、表单验证、详解vue-validator(vue验证器)相关内容,已被589网友关注,相关难点技巧可以阅读下方的电子资料。
详解vue-validator(vue验证器)
官方文档:http://vuejs.github.io/vue-validator/zh-cn/index.html
github项目地址:https://github.com/vuejs/vue-validator
单独使用vue-validator的方法见官方文档,本文结合vue-router使用。
安装验证器
不添加自定义验证器或者无需全局使用的公用验证器,在main.js中安装验证器,使用 CommonJS 模块规范, 需要显式的使用 Vue.use() 安装验证器组件。
import Validator from 'vue-validator'
Vue.use(Validator)
与 vue-router 同时使用,必须在调用 router#map, router#start 等实例方法前安装验证。
若要自定义验证器,建一个js文件,在该文件中安装验证器组件。例如:validation.js
import Vue from 'vue'
import Validator from 'vue-validator'
Vue.use(Validator)
//自定义验证器
自定义验证器
官方提供的api如下
- input[type="text"]
- input[type="radio"]
- input[type="checkbox"]
- input[type="number"]
- input[type="password"]
- input[type="email"]
- input[type="tel"]
- input[type="url"]
- select
- textarea
但是以上的不一定满足我们的需求,这时就需要用到另一个全局api,用于注册和获取全局验证器。
Vue.validator( id, [definition] )
示例 定义validation.js 内容如下
import Vue from 'vue'
import Validator from 'vue-validator'
Vue.use(Validator)
//自定义验证器
//添加一个简单的手机号验证
//匹配0-9之间的数字,并且长度是11位
Vue.validator('tel', function (val) {
 return /^[0-9]{11}$/.test(val)
});
//添加一个密码验证
//匹配6-20位的任何字类字符,包括下划线。与“[A-Za-z0-9_]”等效。
Vue.validator('passw', function (val) {
 return /^(\w){6,20}$/.test(val)
});
使用验证器
验证器语法
<validator name="validation">
  <input type="text" v-model='comment' id='comment' v-validate:comment="{ minlength: 3, maxlength: 15 }">
  <div>
   <span v-show="$validation.comment.minlength">不得少于3个字符</span>
   <span v-show="$validation.comment.maxlength">不得大于15个字符</span>
  </div>
 </validator>
默认情况下,vue-validator 会根据 validator 和 v-validate 指令自动进行验证。然而有时候我们需要关闭自动验证,在有需要时手动触发验证。如果你不需要自动验证,可以通过 initial 属性或 v-validate 验证规则来关闭自动验证。如下:
<validator name="validation">
   <input type="text" v-model='comment' id='comment' v-validate:comment="{ minlength: 3, maxlength: 15 }" detect-change="off" initial='off'>
   <div>
    <span v-show="$validation.comment.minlength">不得少于3个字符</span>
    <span v-show="$validation.comment.maxlength">不得大于15个字符</span>
   </div>
</validator>
Terminal 指令问题
<validator name="test_validator">
  <!-- @invalid:valid的逆 ,表示验证不通过 -->
  <input @invalid="passwInvalid" @valid="passwok" type="password" v-model='passw' id='passw' v-validate:passw="['passw']" detect-change="off" initial='off' placeholder='请输入密码'>
  <input @invalid="passwInvalid" @valid="passwok" type="password" v-model='passw2' id='passw2' v-validate:passw2="['passw']" detect-change="off" initial='off' placeholder='请输入密码'>
</validator>
<script>
//若是在main.js中导入 无需再次导入
//此处导入的是上面代码的validation.js
import validator from '../validator/validation'
export default{
  data(){
    return{
      comment:'',
      passw:'',
      passw2:''
    }
  },
  methods:{
    passwInvalid(){
      alert('只能输入6-20个字母、数字、下划线');
    },
    passwok(){
      //alert('验证码符合规范')
    }
  }
}
</script>
示例:用户注册验证
用了一个组件来显示提示信息
toast.vue
<template>
  <div v-show="toastshow" transition="toast" class="toast font-normal">
    {{toasttext}}
  </div>
</template>
<script>
export default{
  props:{
    //是否显示提示
    toastshow:{
      type:Boolean,
       required: false,
      default:function(){
        return false;
      }
    },
    //提示的内容
    toasttext:{
      type:String,
      required: false,
      default:function(){
        return 'no message';
      }
    },
    //显示的时间
    duration: {
      type: Number,
      default:3000,//默认3秒
      required:false
    }
  },
  ready() {

  },
  watch:{
    toastshow(val){
      if (this._timeout) clearTimeout(this._timeout)
      if (val && !!this.duration) {
       this._timeout = setTimeout(()=> this.toastshow = false, this.duration)
      }
    }
  }
}
</script>
<style>
  .toast{
    position:absolute;
    left:50%;
    margin-left:-25%;
    bottom:30px;
    display:block;
    width:200px;
    height:auto;
    text-align:center;
    color:white;
    background-color:rgba(0,0,0,0.5);
    border-radius:10px;
    z-index:10;
    transform:scale(1);
    padding:5px;
  }
  .toast-transition{
    transition: all .3s ease;
  }
  .toast-enter{
    opacity:0;
    transform:scale(0.1);
  }
  .toast-leave{
    opacity:0;
    transform:scale(0.1);
  }
</style>
注册用户:假如我们需要填写手机号和输入两次密码
<template>
  <div class='register-box'>
    <!-- 组件:用于显示提示信息 -->
    <Toast :toastshow.sync="toastshow" :toasttext="toasttext"></Toast>
    <validator name="validation_register1">
    <div class='register1'>
      <div class='pd05'>
      <input @invalid="telonInvalid" initial="off" detect-change="off" v-model="telphone" id="telphone" type="tel" class='phone-number' v-validate:telphone="['tel']" placeholder='请输入手机号码'>
      </div>
      <div class='pd05'>
        <input @invalid="passwInvalid" v-model="passw1" initial="off" detect-change="off" id="passw1" type="password" v-validate:passw1="['passw']" class='password-number' placeholder='请输入密码'>
      </div>
      <div class='pd05'>
        <input @invalid="passwInvalid" v-model="passw2" initial="off" detect-change="off" id="passw2" type="password" v-validate:passw2="['passw']" class='password-number' placeholder='请输入密码'>
      </div>
      <a class='greenBtn' v-on:click='register_user()'>下一步</a>
    </div>
    </validator>
  </div>
</template>
<script>
//导入validation.js 此处的validation.js就是上文中validation.js的内容
import validator from '../validator/validation';
//导入显示提示信息的组件
import Toast from '../components/toast.vue';
export default{
  components: {
    //注册组件
     Toast
   },
  data(){
    return{
      telphone:'',//电话号码
      toastshow:false,//默认不现实提示信息
      toasttext:'',//提示信息内容
      passw1:'',//首次输入密码
      passw2:''//再次输入密码
    }
  },
  methods:{
    //手机号验证失败时执行的方法
    telonInvalid(){
      //设置提示信息内容
      this.$set('toasttext','手机不正确');
      //显示提示信息组件
      this.$set('toastshow',true);
    },
    //密码验证失败时执行的方法
    passwInvalid(){
      this.$set('toasttext','只能输入6-20个字母、数字、下划线');
      this.$set('toastshow',true);
    },
    register_user(){
      var that = this;
      var telephones = that.$get('telphone');
      var pw1 = that.$get('passw1');
      var pw2 = that.$get('passw2')
      that.$validate(true, function () {
        if (that.$validation_register1.invalid) {
          //验证无效
           that.$set('toasttext','请完善表单');
           that.$set('toastshow',true);
        }else{
           that.$set('toasttext','验证通过');
           that.$set('toastshow',true);
           //验证通过做注册请求
           /*that.$http.post('http://192.168.30.235:9999/rest/user/register',{'account':telephones,'pwd':pw1,'pwd2':pw2}).then(function(data){
            if(data.data.code == '0'){
              that.$set('toasttext','注册成功');
               that.$set('toastshow',true);
            }else{
              that.$set('toasttext','注册失败');
               that.$set('toastshow',true);
            }
          },function(error){
            //显示返回的错误信息
            that.$set('toasttext',String(error.status));
            that.$set('toastshow',true);
          })*/
        }
      })

    }
  }
}
</script>
<style>
.register-box{
  padding: 10px;
}
.pd05{
  margin-top: 5px;
}
.greenBtn{
  width: 173px;
  height: 30px;
  text-align: center;
  line-height: 30px;
  background: red;
  color: #fff;
  margin-top: 5px;
}
</style>
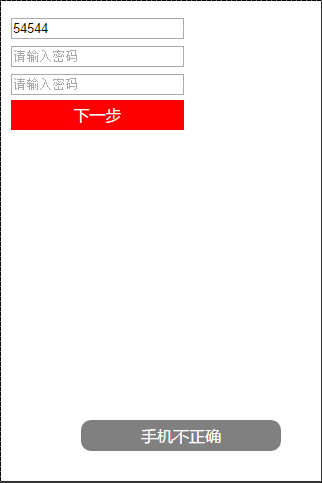
若点击下一步,会提示“请完善表单”,因为验证不通过;若是文本框获得焦点后失去焦点则会提示相应的错误信息;若内容填写正确,则会提示验证通过并发送相应的请求。
效果如图
以上就是本文的全部内容,希望对大家的学习有所帮助,也希望大家多多支持码农之家。

