为网友们分享了相关的编程文章,网友姜建同根据主题投稿了本篇教程内容,涉及到Spring Boot之SpringSecurity、SpringSecurity、Spring Boot之SpringSecurity相关内容,已被652网友关注,如果对知识点想更进一步了解可以在下方电子资料中获取。
Spring Boot之SpringSecurity
一 SpringSecurity简介
- Web开发中,虽然安全属于非共功能性需求,但也是应用非常重要的一部分。
- 如果开发后期才考虑安全问题,就会有两方面的弊处:
- 一方面,应用存在严重的安全漏洞,无法满足用户需求,可能造成用户隐私数据被攻击者窃取
- 另一方面,应用的基本架构已经确定,要修复安全漏洞,可能需要对系统的架构做出比较重大的调整,会需要更多的开发时间,影响应用的发布进程
- 结论:从应用开发的第一天就要把安全相关的因素考虑进来,并持续在整个应用的开发过程中
- Spring Security是一个功能强大且高度可定制的身份验证和访问控制框架。它实际上是保护基于spring的应用程序的标准Spring Security是一个框架,侧重于为Java应用程序提供身份验证和授权。
- Spring安全性的真正强大之处在于它可以轻松地扩展以满足定制需求
- Spring 是一个非常流行和成功的 Java 应用开发框架。Spring Security 基于 Spring 框架,提供了一套Web 应用安全性的完整解决方案。一般来说,Web 应用的安全性包括用户认证(Authentication)和用户授权(Authorization)两个部分。
- 用户认证指的是验证某个用户是否为系统中的合法主体,也就是说用户能否访问该系统。用户认证一般要求用户提供用户名和密码。系统通过校验用户名和密码来完成认证过程。
- 用户授权指的是验证某个用户是否有权限执行某个操作。在一个系统中,不同用户所具有的权限是不同的。比如对一个文件来说,有的用户只能进行读取,而有的用户可以进行修改。一般来说,系统会为不同的用户分配不同的角色,而每个角色则对应一系列的权限。
- 在用户认证方面,SpringSecurity 框架支持主流的认证方式,包括==HTTP 基本认证、HTTP 表单验证、HTTP 摘要认证、OpenID和LDAP ==等。
- 在用户授权方面,Spring Security 提供了基于角色的访问控制和访问控制列表(Access Control List,ACL),可以对应用中的领域对象进行细粒度的控制。
- Spring Security 是针对Spring项目的安全框架,也是Spring Boot底层安全模块默认的技术选型,可以实现强大的Web安全控制,对于安全控制,仅需要引入 spring-boot-starter-security 模块,进行少量的配置,即可实现强大的安全管理!
- 几个重要的类
- WebSecurityConfigurerAdapter: 自定义Security策略
- AuthenticationManagerBuilder:自定义认证策略
- @EnableWebSecurity:开启WebSecurity模式
- Spring Security的两个主要目标是 “认证” 和 “授权”(访问控制)
- “认证”(Authentication)
- 身份验证是关于验证您的凭据,如用户名/用户ID和密码,以验证您的身份。
- 身份验证通常通过用户名和密码完成,有时与身份验证因素结合使用。
- “授权” (Authorization)
- 授权发生在系统成功验证您的身份后,最终会授予您访问资源(如信息,文件,数据库,资金,位置,几乎任何内容)的完全权限。
二 实战演示
0. 环境 介绍
- jdk 1.8
- Spring Boot 2.0.9.RELEASE
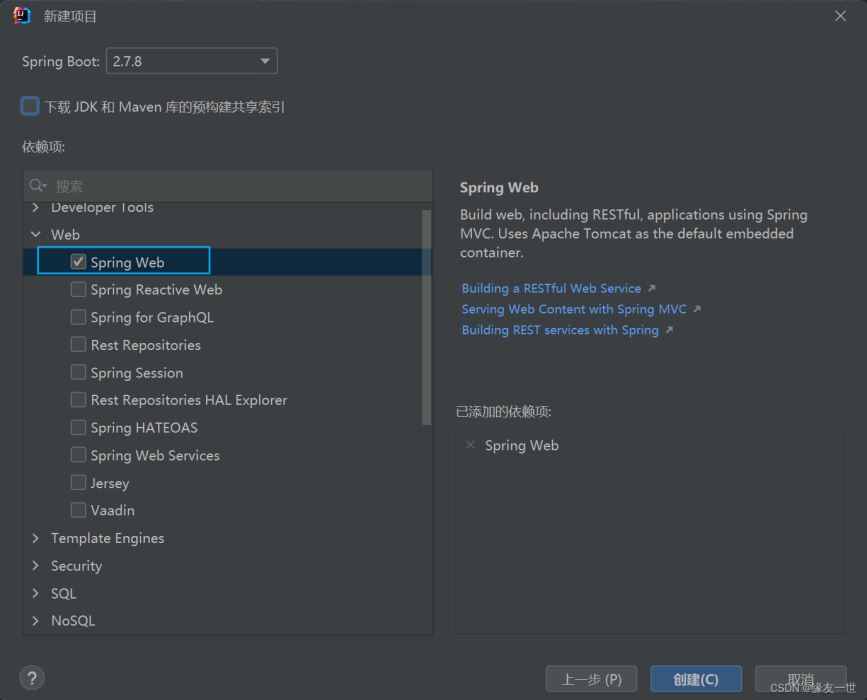
1. 新建一个初始的springboot项目
2. 导入thymeleaf依赖
<!--thymeleaf-->
<dependency>
<groupId>org.thymeleaf</groupId>
<artifactId>thymeleaf-spring5</artifactId>
</dependency>
<dependency>
<groupId>org.thymeleaf.extras</groupId>
<artifactId>thymeleaf-extras-java8time</artifactId>
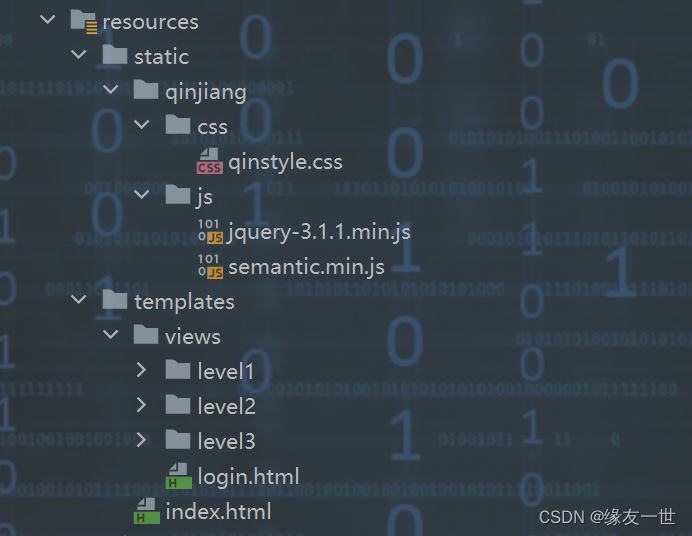
</dependency>3. 导入静态资源
4. 编写controller跳转
import org.springframework.stereotype.Controller;
import org.springframework.web.bind.annotation.PathVariable;
import org.springframework.web.bind.annotation.RequestMapping;

/**
 * @author 缘友一世
 * date 2022/9/11-21:56
 */
@Controller
public class RouterController {
    @RequestMapping({"/","/index"})
    public String index() {
         return "index";
    }
    @RequestMapping("/toLogin")
    public String toLogin() {
        return "views/login";
    }
    @RequestMapping("/level1/{id}")
    public String level1(@PathVariable("id") int id) {
        return "views/level1/"+id;
    }
    @RequestMapping("/level2/{id}")
    public String level2(@PathVariable("id") int id) {
        return "views/level2/"+id;
    }
    @RequestMapping("/level3/{id}")
    public String level3(@PathVariable("id") int id) {
        return "views/level3/"+id;
    }
}
5. 认证和授权
- Spring Security 增加上认证和授权的功能
引入Spring Security模块
<dependency>
    <groupId>org.springframework.boot</groupId>
    <artifactId>spring-boot-starter-security</artifactId>
</dependency>
2.编写 Spring Security 配置类
import org.springframework.security.config.annotation.authentication.builders.AuthenticationManagerBuilder;
import org.springframework.security.config.annotation.web.builders.HttpSecurity;
import org.springframework.security.config.annotation.web.configuration.EnableWebSecurity;
import org.springframework.security.config.annotation.web.configuration.WebSecurityConfigurerAdapter;
import org.springframework.security.crypto.bcrypt.BCryptPasswordEncoder;

/**
 * @author 缘友一世
 * date 2022/9/11-22:13
 */
// 开启WebSecurity模式
@EnableWebSecurity //AOP 拦截器
public class SecurityConfig extends WebSecurityConfigurerAdapter {
    //链式编程
    @Override
    protected void configure(HttpSecurity http) throws Exception {

    }
3.定制请求的授权规则
 //链式编程
    @Override
    protected void configure(HttpSecurity http) throws Exception {
        //首页所有人可以访问,功能页面只有对应的人可以访问
        //请求授权的规则
        http.authorizeRequests().antMatchers("/").permitAll()
                .antMatchers("/level1/**").hasRole("vip1")
                .antMatchers("/level2/**").hasRole("vip2")
                .antMatchers("/level3/**").hasRole("vip3");
    }
4.测试一下:发现除了首页都进不去了!因为我们目前没有登录的角色,因为请求需要登录的角色拥有对应的权限才可以
5.在 configure() 方法中加入以下配置,开启自动配置的登录功能
//没有权限默认回到登录页面,需要开启登录的页面
http.formLogin();
6.定义认证规则,重写 configure(AuthenticationManagerBuilder auth) 方法
- 要将前端传过来的密码进行某种方式加密,否则就无法登录

/**
     * 要将前端传过来的密码进行某种方式加密,否则就无法登录
     * @param auth
     * @throws Exception
     */
    @Override //认证 密码编码 PassWordEncoder
    protected void configure(AuthenticationManagerBuilder auth) throws Exception {

        auth.inMemoryAuthentication().passwordEncoder(new BCryptPasswordEncoder())
                .withUser("yang").password(new BCryptPasswordEncoder().encode("123456")).roles("vip2","vip3")
                .and()
                .withUser("root").password(new BCryptPasswordEncoder().encode("123456")).roles("vip1","vip2","vip3")
                .and()
                .withUser("guest").password(new BCryptPasswordEncoder().encode("123456")).roles("vip1");
    }
6. 权限控制和注销
开启自动配置的注销的功能
@EnableWebSecurity //AOP 拦截器
public class SecurityConfig extends WebSecurityConfigurerAdapter {
    //链式编程
    @Override
    protected void configure(HttpSecurity http) throws Exception {
        //首页所有人可以访问,功能页面只有对应的人可以访问
        //请求授权的规则
        http.authorizeRequests().antMatchers("/").permitAll()
                .antMatchers("/level1/**").hasRole("vip1")
                .antMatchers("/level2/**").hasRole("vip2")
                .antMatchers("/level3/**").hasRole("vip3");
        //注销 跳到首页
        http.logout().logoutSuccessUrl("/");
在前端,增加一个注销的按钮, index.html 导航栏中
<a class="item" th:href="@{/logout}" rel="external nofollow"  rel="external nofollow"  rel="external nofollow" >
	<i class="address card icon"></i> 注销
</a>
不同身份的用户,显示不同内容
- 用户没有登录的时候,导航栏上只显示登录按钮,用户登录之后,导航栏可以显示登录的用户信息及注销按钮
- sec:authorize=“isAuthenticated()”:是否认证登录! 来显示不同的页面
- 导入依赖
 <!--thymeleaf-security整合包-->
    <!-- https://mvnrepository.com/artifact/org.thymeleaf.extras/thymeleaf-extras-springsecurity4 -->
    <dependency>
        <groupId>org.thymeleaf.extras</groupId>
        <artifactId>thymeleaf-extras-springsecurity4</artifactId>
        <version>3.0.4.RELEASE</version>
    </dependency>
在前端页面导入命名空间
<html lang="en" xmlns:th="http://www.thymeleaf.org"
  xmlns:sec="http://www.thymeleaf.org/thymeleaf-extras-springsecurity4">
修改导航栏,增加认证判断
<!--index.html-->
<!--登录注销-->
            <div class="right menu">
                <!--如果未登录-->
                <div sec:authorize="!isAuthenticated()">
                    <a class="item" th:href="@{/toLogin}" rel="external nofollow"  rel="external nofollow" >
                        <i class="address card icon"></i> 登录
                    </a>
                </div>

                <!--如果登陆了:用户名、注销-->
                <!--当登录、用户名、退出同时出现,是spring版本太高了,降至2.0.9/7 就能正常了-->
                <div sec:authorize="isAuthenticated()">
                    <a class="item" >
                        用户名:<span sec:authentication="name"></span>
                    </a>
                </div>
                <div sec:authorize="isAuthenticated()">
                    <a class="item" th:href="@{/logout}" rel="external nofollow"  rel="external nofollow"  rel="external nofollow" >
                        <i class="sign-out icon"></i> 注销
                    </a>
                </div>
            </div>
如果注销404,就是因为它默认防止csrf跨站请求伪造,因为会产生安全问题,我们可以将请求改为post表单提交,或者在spring security中关闭csrf功能;我们试试
	//链式编程
	    @Override
	    protected void configure(HttpSecurity http) throws Exception {
	        //首页所有人可以访问,功能页面只有对应的人可以访问
	        //请求授权的规则
	        http.authorizeRequests().antMatchers("/").permitAll()
	                .antMatchers("/level1/**").hasRole("vip1")
	                .antMatchers("/level2/**").hasRole("vip2")
	                .antMatchers("/level3/**").hasRole("vip3");
	        //没有权限默认回到登录页面,需要开启登录的页面
	        http.formLogin().loginProcessingUrl("/login");

	        //防止网站攻击 csrf--跨站请求伪造
	        http.csrf().disable();
	        //注销 跳到首页
	        http.logout().logoutSuccessUrl("/");
	    }
角色功能块
 <div>
        <br>
        <div class="ui three column stackable grid">

            <div class="column" sec:authorize="hasRole('vip1')">
                <div class="ui raised segment">
                    <div class="ui">
                        <div class="content"> <h5 class="content">Level 1</h5> <hr> <div><a th:href="@{/level1/1}" rel="external nofollow"  rel="external nofollow" ><i class="bullhorn icon"></i> Level-1-1</a></div> <div><a th:href="@{/level1/2}" rel="external nofollow"  rel="external nofollow" ><i class="bullhorn icon"></i> Level-1-2</a></div> <div><a th:href="@{/level1/3}" rel="external nofollow"  rel="external nofollow" ><i class="bullhorn icon"></i> Level-1-3</a></div>
                        </div>
                    </div>
                </div>
            </div>

            <div class="column" sec:authorize="hasRole('vip2')">
                <div class="ui raised segment">
                    <div class="ui">
                        <div class="content"> <h5 class="content">Level 2</h5> <hr> <div><a th:href="@{/level2/1}" rel="external nofollow"  rel="external nofollow" ><i class="bullhorn icon"></i> Level-2-1</a></div> <div><a th:href="@{/level2/2}" rel="external nofollow"  rel="external nofollow" ><i class="bullhorn icon"></i> Level-2-2</a></div> <div><a th:href="@{/level2/3}" rel="external nofollow"  rel="external nofollow" ><i class="bullhorn icon"></i> Level-2-3</a></div>
                        </div>
                    </div>
                </div>
            </div>

            <div class="column" sec:authorize="hasRole('vip3')">
                <div class="ui raised segment">
                    <div class="ui">
                        <div class="content"> <h5 class="content">Level 3</h5> <hr> <div><a th:href="@{/level3/1}" rel="external nofollow"  rel="external nofollow" ><i class="bullhorn icon"></i> Level-3-1</a></div> <div><a th:href="@{/level3/2}" rel="external nofollow"  rel="external nofollow" ><i class="bullhorn icon"></i> Level-3-2</a></div> <div><a th:href="@{/level3/3}" rel="external nofollow"  rel="external nofollow" ><i class="bullhorn icon"></i> Level-3-3</a></div>
                        </div>
                    </div>
                </div>
            </div>

        </div>
    </div>
7. 记住登录
开启记住我功能
//链式编程
    @Override
    protected void configure(HttpSecurity http) throws Exception {
        //首页所有人可以访问,功能页面只有对应的人可以访问
        //请求授权的规则
        http.authorizeRequests().antMatchers("/").permitAll()
                .antMatchers("/level1/**").hasRole("vip1")
                .antMatchers("/level2/**").hasRole("vip2")
                .antMatchers("/level3/**").hasRole("vip3");
        //没有权限默认回到登录页面,需要开启登录的页面
        http.formLogin().loginProcessingUrl("/login");// 登陆表单提交请求

        //防止网站攻击 csrf--跨站请求伪造
        http.csrf().disable();
        //注销 跳到首页
        http.logout().logoutSuccessUrl("/");
        //开启记住功能 cookie默认保持两周 自定义接收前端的参数
        http.rememberMe().rememberMeParameter("remember");
    }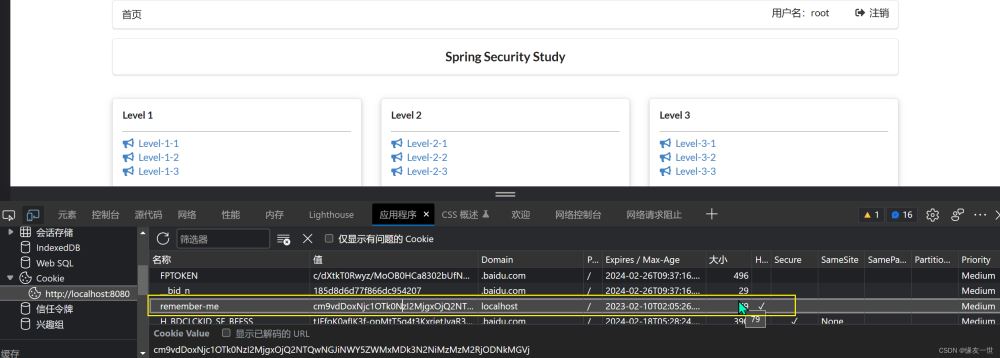
原理:登录成功后,将cookie发送给浏览器保存,以后登录带上这个cookie,只要通过检查就可以免登录了。如果点击注销,则会删除这个cookie
8. 定制登录页面
在登录页配置后面指定.loginPage
<form th:action="@{/login}" method="post">
    <div class="field">
        <label>Username</label>
        <div class="ui left icon input">
            <input type="text" placeholder="Username" name="username">
            <i class="user icon"></i>
        </div>
    </div>
    <div class="field">
        <label>Password</label>
        <div class="ui left icon input">
            <input type="password" name="password">
            <i class="lock icon"></i>
        </div>
    </div>
    <div class="field">
        <input type="checkbox" name="remember"> 记住我
    </div>
    <input type="submit" class="ui blue submit button"/>
</form>
login.html 配置提交请求及方式,方式必须为post
//链式编程
    @Override
    protected void configure(HttpSecurity http) throws Exception {
        //首页所有人可以访问,功能页面只有对应的人可以访问
        //请求授权的规则
        http.authorizeRequests().antMatchers("/").permitAll()
                .antMatchers("/level1/**").hasRole("vip1")
                .antMatchers("/level2/**").hasRole("vip2")
                .antMatchers("/level3/**").hasRole("vip3");
        //没有权限默认回到登录页面,需要开启登录的页面
        http.formLogin().loginPage("/toLogin");

        //防止网站攻击 csrf--跨站请求伪造
        http.csrf().disable();
        //注销 跳到首页
        http.logout().logoutSuccessUrl("/");
        //开启记住功能 cookie默认保持两周 自定义接收前端的参数
        http.rememberMe().rememberMeParameter("remember");
    }
配置接收登录的用户名和密码的参数!
http.formLogin()
.usernameParameter("username")
.passwordParameter("password")
.loginPage("/toLogin")
.loginProcessingUrl("/login"); // 登陆表单提交请求
在登录页增加记住我的多选框
<input type="checkbox" name="remember"> 记住我
后端验证处理
//定制记住我的参数!
http.rememberMe().rememberMeParameter("remember");
三 完整代码
3.1 pom配置文件
<dependencies>
   <!--thymeleaf-security整合包-->
    <!-- https://mvnrepository.com/artifact/org.thymeleaf.extras/thymeleaf-extras-springsecurity4 -->
    <dependency>
        <groupId>org.thymeleaf.extras</groupId>
        <artifactId>thymeleaf-extras-springsecurity4</artifactId>
        <version>3.0.4.RELEASE</version>
    </dependency>

    <!--thymeleaf-->
    <dependency>
        <groupId>org.thymeleaf</groupId>
        <artifactId>thymeleaf-spring5</artifactId>
    </dependency>
    <dependency>
        <groupId>org.thymeleaf.extras</groupId>
        <artifactId>thymeleaf-extras-java8time</artifactId>
    </dependency>

    <dependency>
        <groupId>org.springframework.boot</groupId>
        <artifactId>spring-boot-starter-web</artifactId>
    </dependency>

    <dependency>
        <groupId>org.springframework.boot</groupId>
        <artifactId>spring-boot-starter-security</artifactId>
    </dependency>

    <dependency>
        <groupId>org.springframework.boot</groupId>
        <artifactId>spring-boot-starter-test</artifactId>
        <scope>test</scope>
    </dependency>
</dependencies>
3.2 RouterController.java
import org.springframework.stereotype.Controller;
import org.springframework.web.bind.annotation.PathVariable;
import org.springframework.web.bind.annotation.RequestMapping;

/**
 * @author 缘友一世
 * date 2022/9/11-21:56
 */
@Controller
public class RouterController {
    @RequestMapping({"/","/index"})
    public String index() {
         return "index";
    }
    @RequestMapping("/toLogin")
    public String toLogin() {
        return "views/login";
    }
    @RequestMapping("/level1/{id}")
    public String level1(@PathVariable("id") int id) {
        return "views/level1/"+id;
    }
    @RequestMapping("/level2/{id}")
    public String level2(@PathVariable("id") int id) {
        return "views/level2/"+id;
    }
    @RequestMapping("/level3/{id}")
    public String level3(@PathVariable("id") int id) {
        return "views/level3/"+id;
    }
}
3.3 SecurityConfig.java
import org.springframework.security.config.annotation.authentication.builders.AuthenticationManagerBuilder;
import org.springframework.security.config.annotation.web.builders.HttpSecurity;
import org.springframework.security.config.annotation.web.configuration.EnableWebSecurity;
import org.springframework.security.config.annotation.web.configuration.WebSecurityConfigurerAdapter;
import org.springframework.security.crypto.bcrypt.BCryptPasswordEncoder;

/**
 * @author 缘友一世
 * date 2022/9/11-22:13
 */

@EnableWebSecurity //AOP 拦截器
public class SecurityConfig extends WebSecurityConfigurerAdapter {
    //链式编程
    @Override
    protected void configure(HttpSecurity http) throws Exception {
        //首页所有人可以访问,功能页面只有对应的人可以访问
        //请求授权的规则
        http.authorizeRequests().antMatchers("/").permitAll()
                .antMatchers("/level1/**").hasRole("vip1")
                .antMatchers("/level2/**").hasRole("vip2")
                .antMatchers("/level3/**").hasRole("vip3");
        //没有权限默认回到登录页面,需要开启登录的页面
        http.formLogin().usernameParameter("username")
                        .passwordParameter("password")
                        .loginPage("/toLogin")
                		.loginProcessingUrl("/login");

        //防止网站攻击 csrf--跨站请求伪造
        http.csrf().disable();
        //注销 跳到首页
        http.logout().logoutSuccessUrl("/");
        //开启记住功能 cookie默认保持两周 自定义接收前端的参数
        http.rememberMe().rememberMeParameter("remember");
    }

	/**
     * 要将前端传过来的密码进行某种方式加密,否则就无法登录
     * @param auth
     * @throws Exception
     */
    @Override //认证 密码编码 PassWordEncoder
    protected void configure(AuthenticationManagerBuilder auth) throws Exception {

        auth.inMemoryAuthentication().passwordEncoder(new BCryptPasswordEncoder())
                .withUser("yang").password(new BCryptPasswordEncoder().encode("123456")).roles("vip2","vip3")
                .and()
                .withUser("root").password(new BCryptPasswordEncoder().encode("123456")).roles("vip1","vip2","vip3")
                .and()
                .withUser("guest").password(new BCryptPasswordEncoder().encode("123456")).roles("vip1");
    }
}
3.4 login.html
<!DOCTYPE html>
<html lang="en" xmlns:th="http://www.thymeleaf.org">
<head>
    <meta charset="UTF-8">
    <meta name="viewport" content="width=device-width, initial-scale=1, maximum-scale=1">
    <title>登录</title>
    <!--semantic-ui-->
    <link href="https://cdn.bootcss.com/semantic-ui/2.4.1/semantic.min.css" rel="external nofollow"  rel="external nofollow"  rel="stylesheet">
</head>
<body>

<!--主容器-->
<div class="ui container">

    <div class="ui segment">

        <div style="text-align: center">
            <h1 class="header">登录</h1>
        </div>

        <div class="ui placeholder segment">
            <div class="ui column very relaxed stackable grid">
                <div class="column">
                    <div class="ui form">
                        <form th:action="@{/login}" method="post"> <div class="field">     <label>Username</label>     <div class="ui left icon input">         <input type="text" placeholder="Username" name="username">         <i class="user icon"></i>     </div> </div> <div class="field">     <label>Password</label>     <div class="ui left icon input">         <input type="password" name="password">         <i class="lock icon"></i>     </div> </div> <div class="field">     <input type="checkbox" name="remember"> 记住我 </div> <input type="submit" class="ui blue submit button"/>
                        </form>
                    </div>
                </div>
            </div>
        </div>

        <div style="text-align: center">
            <div class="ui label">
                </i>注册
            </div>
            <br><br>
            <small>blog.kuangstudy.com</small>
        </div>
        <div class="ui segment" style="text-align: center">
            <h3>Spring Security Study</h3>
        </div>
    </div>
</div>

<script th:src="@{/qinjiang/js/jquery-3.1.1.min.js}"></script>
<script th:src="@{/qinjiang/js/semantic.min.js}"></script>

</body>
</html>
3.5 index.html
<!DOCTYPE html>
<html lang="en" xmlns:th="http://www.thymeleaf.org"
      xmlns:sec="http://www.thymeleaf.org/thymeleaf-extras-springsecurity4">
<head>
    <meta charset="UTF-8">
    <meta name="viewport" content="width=device-width, initial-scale=1, maximum-scale=1">
    <title>首页</title>
    <!--semantic-ui-->
    <link href="https://cdn.bootcss.com/semantic-ui/2.4.1/semantic.min.css" rel="external nofollow"  rel="external nofollow"  rel="stylesheet">
    <link th:href="@{/qinjiang/css/qinstyle.css}" rel="external nofollow"  rel="stylesheet">
</head>
<body>

<!--主容器-->
<div class="ui container">

    <div class="ui segment" id="index-header-nav" th:fragment="nav-menu">
        <div class="ui secondary menu">
            <a class="item"  th:href="@{/index}" rel="external nofollow" >首页</a>

            <!--登录注销-->
            <div class="right menu">
                <!--如果未登录-->
                <div sec:authorize="!isAuthenticated()">
                    <a class="item" th:href="@{/toLogin}" rel="external nofollow"  rel="external nofollow" >
                        <i class="address card icon"></i> 登录
                    </a>
                </div>

                <!--如果登陆了:用户名、注销-->
                <!--当登录、用户名、退出同时出现,是spring版本太高了,降至2.0.9/7 就能正常了-->
                <div sec:authorize="isAuthenticated()">
                    <a class="item" >
                        用户名:<span sec:authentication="name"></span>
                    </a>
                </div>
                <div sec:authorize="isAuthenticated()">
                    <a class="item" th:href="@{/logout}" rel="external nofollow"  rel="external nofollow"  rel="external nofollow" >
                        <i class="sign-out icon"></i> 注销
                    </a>
                </div>
                <!--已登录
                <a th:href="@{/usr/toUserCenter}" rel="external nofollow" >
                    <i class="address card icon"></i> admin
                </a>
                -->
            </div>
        </div>
    </div>

    <div class="ui segment" style="text-align: center">
        <h3>Spring Security Study</h3>
    </div>

    <div>
        <br>
        <div class="ui three column stackable grid">

            <div class="column" sec:authorize="hasRole('vip1')">
                <div class="ui raised segment">
                    <div class="ui">
                        <div class="content"> <h5 class="content">Level 1</h5> <hr> <div><a th:href="@{/level1/1}" rel="external nofollow"  rel="external nofollow" ><i class="bullhorn icon"></i> Level-1-1</a></div> <div><a th:href="@{/level1/2}" rel="external nofollow"  rel="external nofollow" ><i class="bullhorn icon"></i> Level-1-2</a></div> <div><a th:href="@{/level1/3}" rel="external nofollow"  rel="external nofollow" ><i class="bullhorn icon"></i> Level-1-3</a></div>
                        </div>
                    </div>
                </div>
            </div>

            <div class="column" sec:authorize="hasRole('vip2')">
                <div class="ui raised segment">
                    <div class="ui">
                        <div class="content"> <h5 class="content">Level 2</h5> <hr> <div><a th:href="@{/level2/1}" rel="external nofollow"  rel="external nofollow" ><i class="bullhorn icon"></i> Level-2-1</a></div> <div><a th:href="@{/level2/2}" rel="external nofollow"  rel="external nofollow" ><i class="bullhorn icon"></i> Level-2-2</a></div> <div><a th:href="@{/level2/3}" rel="external nofollow"  rel="external nofollow" ><i class="bullhorn icon"></i> Level-2-3</a></div>
                        </div>
                    </div>
                </div>
            </div>

            <div class="column" sec:authorize="hasRole('vip3')">
                <div class="ui raised segment">
                    <div class="ui">
                        <div class="content"> <h5 class="content">Level 3</h5> <hr> <div><a th:href="@{/level3/1}" rel="external nofollow"  rel="external nofollow" ><i class="bullhorn icon"></i> Level-3-1</a></div> <div><a th:href="@{/level3/2}" rel="external nofollow"  rel="external nofollow" ><i class="bullhorn icon"></i> Level-3-2</a></div> <div><a th:href="@{/level3/3}" rel="external nofollow"  rel="external nofollow" ><i class="bullhorn icon"></i> Level-3-3</a></div>
                        </div>
                    </div>
                </div>
            </div>

        </div>
    </div>

</div>
<script th:src="@{/qinjiang/js/jquery-3.1.1.min.js}"></script>
<script th:src="@{/qinjiang/js/semantic.min.js}"></script>

</body>
</html>
3.6 效果展示

到此这篇关于Spring Boot中的SpringSecurity学习的文章就介绍到这了,更多相关Spring Boot之SpringSecurity内容请搜索码农之家以前的文章或继续浏览下面的相关文章希望大家以后多多支持码农之家!


