给寻找编程代码教程的朋友们精选了相关的编程文章,网友红盼山根据主题投稿了本篇教程内容,涉及到RabbitMQ Work Queue工作队列、RabbitMQ Work Queue、RabbitMQ 工作队列、RabbitMQ Work Queue相关内容,已被768网友关注,下面的电子资料对本篇知识点有更加详尽的解释。
RabbitMQ Work Queue
RabbitMQ Work Queue工作队列

工作队列(又称任务队列)的主要思想是避免立即执行资源密集型任务,而不得不等待它完成。
相反我们安排任务在之后执行。我们把任务封装为消息并将其发送到队列。在后台运行的工作进程将弹出任务并最终执行作业。当有多个工作线程时,这些工作线程将一起处理这些任务。
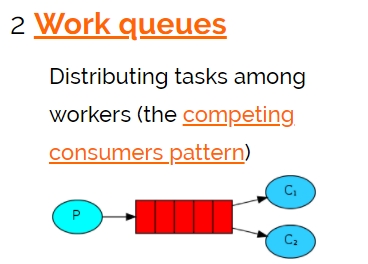
多个消费者绑定到一个队列,同一条消息只会被一个消费者处理。
但是对于工作队列,可以提高消息的处理速度,避免队列中的消息堆积。
我们以一个例子来解释work queue工作队列。在生产者的服务中添加测试方法,通过循环的方式,向名为simple.queue队列中发送50条消息,代码和详细描述如下:
package cn.itcast.mq.spring;
import org.junit.Test;
import org.junit.runner.RunWith;
import org.springframework.amqp.rabbit.core.RabbitTemplate;
import org.springframework.beans.factory.annotation.Autowired;
import org.springframework.boot.test.context.SpringBootTest;
import org.springframework.test.context.junit4.SpringRunner;
@SpringBootTest
@RunWith(SpringRunner.class)
public class SpringAmqpTest {
@Autowired
private RabbitTemplate rabbitTemplate;
@Test
public void testSendMessage2WorkQueue() throws InterruptedException {
String queueName="simple.queue";//队列名称
String message = "hello, message_";//发送的消息
for (int i=1;i<=50;i++){
rabbitTemplate.convertAndSend(queueName,message+i);
Thread.sleep(20);
}
}
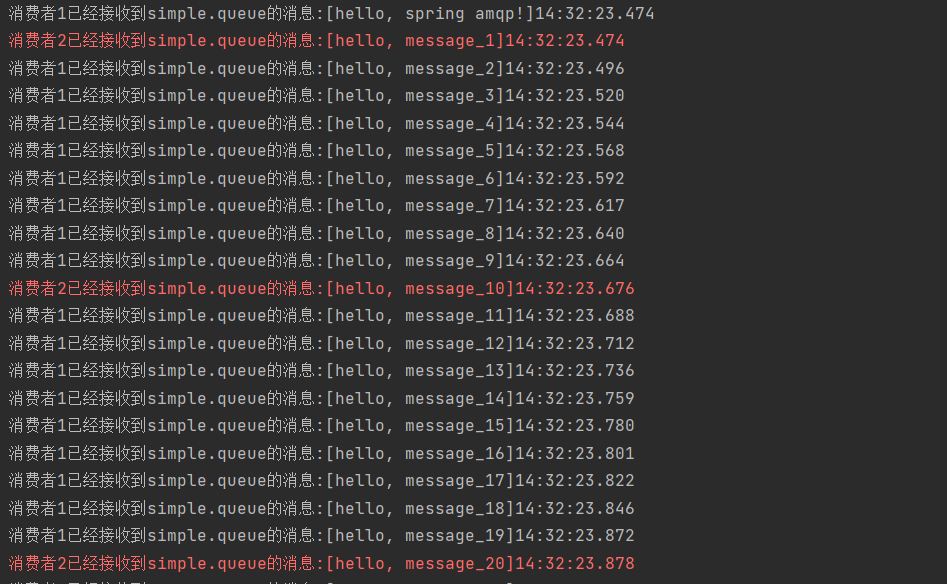
}在消费者的服务模块中,定义两个消息监听,分别为listenSimpleQueue1和listenSimpleQueue2,让它们都监听simple.queue队列,并且设置休眠时间,使得消费者1每秒处理50条消息,消费者2每秒处理10条消息。
package cn.itcast.mq.listener;
import org.springframework.amqp.rabbit.annotation.RabbitListener;
import org.springframework.stereotype.Component;
import java.time.LocalTime;
@Component
public class SpringRabbitListener {
    @RabbitListener(queues="simple.queue")
    public void listenSimpleQueue1(String msg) throws InterruptedException {
        System.out.println("消费者1已经接收到simple.queue的消息:[" + msg +  "]"+ LocalTime.now());
        Thread.sleep(20);
    }
    @RabbitListener(queues="simple.queue")
    public void listenSimpleQueue2(String msg) throws InterruptedException {
        System.err.println("消费者2已经接收到simple.queue的消息:[" + msg +  "]"+LocalTime.now());
        Thread.sleep(200);
    }
}
消费者的application.yaml文件,设置消费者每次只能获取一条消息,生产者和消费者的配置文件相似。
logging:
  pattern:
    dateformat: MM-dd HH:mm:ss:SSS
spring:
  rabbitmq:
    host: 192.168.220.13*
    port: 5672
    username: user
    password: ******
    virtual-host: /
    Listener:
      simple:
        prefetch: 1 #每次只能获取一条消息,处理完成才能获取下一条消息 控制消费者预取消息的上限
处理完成后,运行项目,可以得到消费者1和消费者2都能消费消息,并且可以根据休眠时间有序进行工作。
到此这篇关于RabbitMQ实现Work Queue工作队列的示例详解的文章就介绍到这了,更多相关RabbitMQ Work Queue内容请搜索码农之家以前的文章或继续浏览下面的相关文章希望大家以后多多支持码农之家!