给大家整理一篇相关的编程文章,网友许欣怿根据主题投稿了本篇教程内容,涉及到SpringBoot、启动、Tomcat、步骤流程、SpringBoot中如何启动Tomcat流程相关内容,已被596网友关注,涉猎到的知识点内容可以在下方电子书获得。
SpringBoot中如何启动Tomcat流程
前面在一篇文章中介绍了 Spring 中的一些重要的 context。有一些在此文中提到的 context,可以参看上篇文章。
SpringBoot 项目之所以部署简单,其很大一部分原因就是因为不用自己折腾 Tomcat 相关配置,因为其本身内置了各种 Servlet 容器。一直好奇: SpringBoot 是怎么通过简单运行一个 main 函数,就能将容器启动起来,并将自身部署到其上 。此文想梳理清楚这个问题。
我们从SpringBoot的启动入口中分析:
Context 创建
// Create, load, refresh and run the ApplicationContext
context = createApplicationContext();
在SpringBoot 的 run 方法中,我们发现其中很重要的一步就是上面的一行代码。注释也写的很清楚:
创建、加载、刷新、运行 ApplicationContext。
继续往里面走。
protected ConfigurableApplicationContext createApplicationContext() {
  Class<?> contextClass = this.applicationContextClass;
  if (contextClass == null) {
    try {
     contextClass = Class.forName(this.webEnvironment
        ? DEFAULT_WEB_CONTEXT_CLASS : DEFAULT_CONTEXT_CLASS);
    }
    catch (ClassNotFoundException ex) {
     throw new IllegalStateException(
        "Unable create a default ApplicationContext, "
           + "please specify an ApplicationContextClass",
        ex);
   }
  }
  return (ConfigurableApplicationContext) BeanUtils.instantiate(contextClass);
}
逻辑很清楚:
先找到 context 类,然后利用工具方法将其实例化。
其中 第5行 有个判断:如果是 web 环境,则加载 DEFAULT _WEB_CONTEXT_CLASS类。参看成员变量定义,其类名为:
AnnotationConfigEmbeddedWebApplicationContext
此类的继承结构如图:
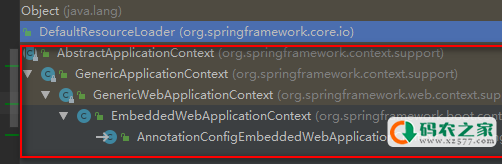
直接继承 GenericWebApplicationContext。关于该类前文已有介绍,只要记得它是专门为 web application提供context 的就好。
refresh
在经历过 Context 的创建以及Context的一些列初始化之后,调用 Context 的 refresh 方法,真正的好戏才开始上演。
从前面我们可以看到AnnotationConfigEmbeddedWebApplicationContext的继承结构,调用该类的refresh方法,最终会由其直接父类:EmbeddedWebApplicationContext 来执行。
@Override
 protected void onRefresh() {
  super.onRefresh();
  try {
    createEmbeddedServletContainer();
  }
  catch (Throwable ex) {
    throw new ApplicationContextException("Unable to start embedded container",
       ex);
  }
}
我们重点看第5行。
private void createEmbeddedServletContainer() {
  EmbeddedServletContainer localContainer = this.embeddedServletContainer;
  ServletContext localServletContext = getServletContext();
  if (localContainer == null && localServletContext == null) {
    EmbeddedServletContainerFactory containerFactory = getEmbeddedServletContainerFactory();
    this.embeddedServletContainer = containerFactory
       .getEmbeddedServletContainer(getSelfInitializer());
  }
  else if (localServletContext != null) {
   try {
     getSelfInitializer().onStartup(localServletContext);
   }
   catch (ServletException ex) {
     throw new ApplicationContextException("Cannot initialize servlet context",
        ex);
   }
  }
  initPropertySources();
}
代码第5行,获取到了一个EmbeddedServletContainerFactory,顾名思义,其作用就是为了下一步创建一个嵌入式的 servlet 容器:EmbeddedServletContainer。
public interface EmbeddedServletContainerFactory {

  /**
   * 创建一个配置完全的但是目前还处于“pause”状态的实例.
   * 只有其 start 方法被调用后,Client 才能与其建立连接。
   */
  EmbeddedServletContainer getEmbeddedServletContainer(
     ServletContextInitializer... initializers);

}
第6、7行,在 containerFactory 获取EmbeddedServletContainer的时候,参数为 getSelfInitializer 函数的执行结果。暂时不管其内部机制如何,只要知道它会返回一个 ServletContextInitializer 用于容器初始化的对象即可,我们继续往下看。
由于 EmbeddedServletContainerFactory 是个抽象工厂,不同的容器有不同的实现,因为SpringBoot默认使用Tomcat,所以就以 Tomcat 的工厂实现类 TomcatEmbeddedServletContainerFactory 进行分析:
 @Override
 public EmbeddedServletContainer getEmbeddedServletContainer(
    ServletContextInitializer... initializers) {
  Tomcat tomcat = new Tomcat();
  File baseDir = (this.baseDirectory != null ? this.baseDirectory
     : createTempDir("tomcat"));
  tomcat.setBaseDir(baseDir.getAbsolutePath());
  Connector connector = new Connector(this.protocol);
  tomcat.getService().addConnector(connector);
  customizeConnector(connector);
  tomcat.setConnector(connector);
  tomcat.getHost().setAutoDeploy(false);
  tomcat.getEngine().setBackgroundProcessorDelay(-);
  for (Connector additionalConnector : this.additionalTomcatConnectors) {
   tomcat.getService().addConnector(additionalConnector);
  }
  prepareContext(tomcat.getHost(), initializers);
  return getTomcatEmbeddedServletContainer(tomcat);
}
从第8行一直到第16行完成了 tomcat 的 connector 的添加。tomcat 中的 connector 主要负责用来处理 http 请求,具体原理可以参看 Tomcat 的源码,此处暂且不提。
第17行的 方法有点长,重点看其中的几行:
 if (isRegisterDefaultServlet()) {
  addDefaultServlet(context);
 }
 if (isRegisterJspServlet() && ClassUtils.isPresent(getJspServletClassName(),
    getClass().getClassLoader())) {
  addJspServlet(context);
  addJasperInitializer(context);
  context.addLifecycleListener(new StoreMergedWebXmlListener());
 }
ServletContextInitializer[] initializersToUse = mergeInitializers(initializers);
configureContext(context, initializersToUse);
前面两个分支判断添加了默认的 servlet类和与 jsp 相关的 servlet 类。
对所有的 ServletContextInitializer 进行合并后,利用合并后的初始化类对 context 进行配置。
第 18 行,顺着方法一直往下走,开始正式启动 Tomcat。
private synchronized void initialize() throws EmbeddedServletContainerException {
  TomcatEmbeddedServletContainer.logger
     .info("Tomcat initialized with port(s): " + getPortsDescription(false));
  try {
    addInstanceIdToEngineName();

    // Remove service connectors to that protocol binding doesn't happen yet
    removeServiceConnectors();

   // Start the server to trigger initialization listeners
   this.tomcat.start();

   // We can re-throw failure exception directly in the main thread
   rethrowDeferredStartupExceptions();

   // Unlike Jetty, all Tomcat threads are daemon threads. We create a
   // blocking non-daemon to stop immediate shutdown
   startDaemonAwaitThread();
  }
  catch (Exception ex) {
   throw new EmbeddedServletContainerException("Unable to start embedded Tomcat",
      ex);
  }
}
第11行正式启动 tomcat。
现在我们回过来看看之前的那个 getSelfInitializer 方法:
private ServletContextInitializer getSelfInitializer() {
  return new ServletContextInitializer() {
   @Override
   public void onStartup(ServletContext servletContext) throws ServletException {
     selfInitialize(servletContext);
   }
  };
}
private void selfInitialize(ServletContext servletContext) throws ServletException {
  prepareEmbeddedWebApplicationContext(servletContext);
  ConfigurableListableBeanFactory beanFactory = getBeanFactory();
  ExistingWebApplicationScopes existingScopes = new ExistingWebApplicationScopes(
     beanFactory);
  WebApplicationContextUtils.registerWebApplicationScopes(beanFactory,
     getServletContext());
  existingScopes.restore();
  WebApplicationContextUtils.registerEnvironmentBeans(beanFactory,
     getServletContext());
  for (ServletContextInitializer beans : getServletContextInitializerBeans()) {
   beans.onStartup(servletContext);
  }
}
在第2行的prepareEmbeddedWebApplicationContext方法中主要是将 EmbeddedWebApplicationContext 设置为rootContext。
第4行允许用户存储自定义的 scope。
第6行主要是用来将web专用的scope注册到BeanFactory中,比如("request", "session", "globalSession", "application")。
第9行注册web专用的environment bean(比如 ("contextParameters", "contextAttributes"))到给定的 BeanFactory 中。
第11和12行,比较重要,主要用来配置 servlet、filters、listeners、context-param和一些初始化时的必要属性。
以其一个实现类ServletContextInitializer试举一例:
@Override
 public void onStartup(ServletContext servletContext) throws ServletException {
  Assert.notNull(this.servlet, "Servlet must not be null");
  String name = getServletName();
  if (!isEnabled()) {
    logger.info("Servlet " + name + " was not registered (disabled)");
    return;
  }
  logger.info("Mapping servlet: '" + name + "' to " + this.urlMappings);
  Dynamic added = servletContext.addServlet(name, this.servlet);
  if (added == null) {
   logger.info("Servlet " + name + " was not registered "
      + "(possibly already registered?)");
   return;
  }
  configure(added);
}
可以看第9行的打印: 正是在这里实现了 servlet 到 URLMapping的映射。
总结
这篇文章从主干脉络分析找到了为什么在SpringBoot中不用自己配置Tomcat,内置的容器是怎么启动起来的,顺便在分析的过程中找到了我们常用的 urlMapping 映射 Servlet 的实现。